Lesson 06: Relationships
One to One Relationships
For a one to one relationship each shop has only one owner and an owner only has one shop. To demonstrate this we need to declare the relationship on either the Shop or ShopOwner model object. In this example we will add the relationship to the Shop object.
persistent object Shop {

	.
	.
	.

	// Related shop owner
	@OneToOne
	ShopOwner owner via shop;
}
As can be seen above, the relationship is declared using the @OneToOne annotation. This is followed by the type of the related object and the names that will be used to reference the relationship. In this case owner will be used for reference from the Shop object and shop will be used as reference from the ShopOwner object. See the example functions below as a demonstration of this.
ShopOwner getShopOwner(Shop shop) {
	return shop.owner;
}
Shop getShop(ShopOwner shopOwner) {
	return shopOwner.shop;
}
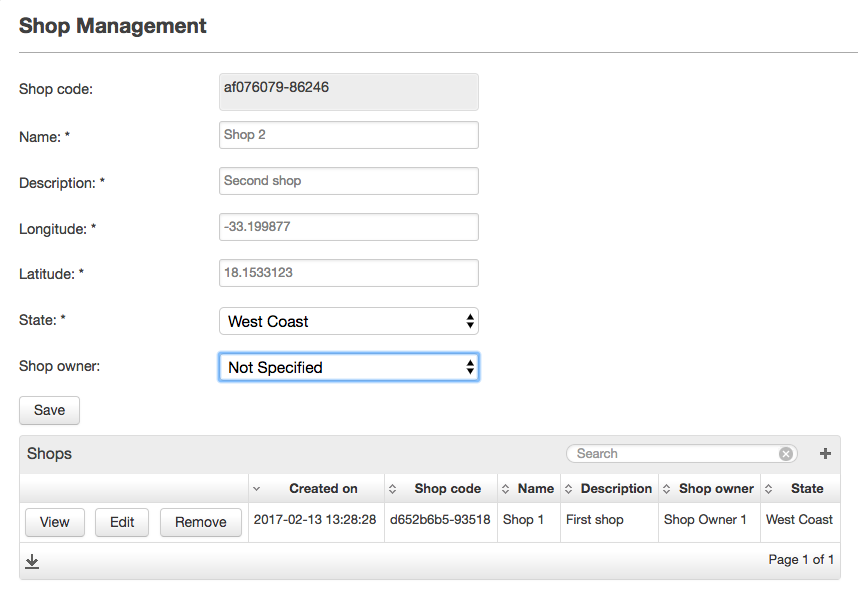
In addition to the declaration of the relationship, we will also make changes to the ShopMgmt view and ShopMgmt unit to set and display the relationship. For the view we need to add a select box:
<select label="select.shop_owner">
	<binding variable="shop">
		<attribute name="owner"/>
	</binding>
	<collectionSource function="getShopOwners">
		<displayAttribute name="firstName"/>
		<displayAttribute name="lastName"/>
	</collectionSource>
</select>
Note the similarity between the select box used above and the select box covered in Lesson 5. Both binds the selected value to a variable but whereas the previous example specified a custom enum as the source for the dropdown, we now specify a collection. With this we then also need to specify the attributes for the collection objects that will be displayed. In this case we selected attributes representing the first and last name of the shop owner. Also take note that validation using validators on the model is not supported for relationships. For this reason manual validation needs to be done using an if statement and a popup message in the saveShop functions:
if(shop.owner == null) {
	Mez:alertError("alert.shop_owner_required");
	return null;
}
We now add a column to the shop table:
<column heading="column_heading.shop_owner">
	<attributeName>owner.firstName</attributeName>
	<attributeName>owner.lastName</attributeName>
</column>
Note that we can reference attributes of the related ShopOwner object by first referencing the relationship and then the attributes in the related object.
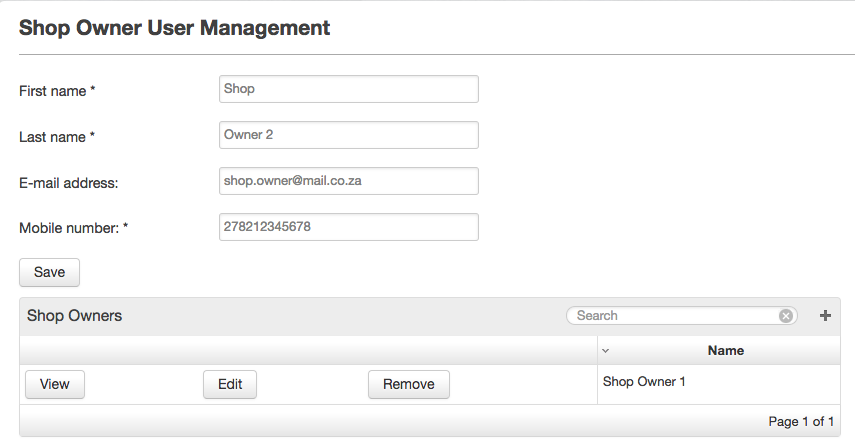
The final addition that we will make to demonstrate the one to one relationship is info widgets on the ShopOwnerDetail view:
<info label="info.shop_owner_firstname">
	<binding variable="shop">
		<attribute name="owner.firstName"/>
	</binding>
</info>
<info label="info.shop_owner_lastname">
	<binding variable="shop">
		<attribute name="owner.lastName"/>
	</binding>
</info>

<info label="info.shop_owner_mobile_number">
	<binding variable="shop">
		<attribute name="owner.mobileNumber"/>
	</binding>
</info>

<info label="info.shop_owner_email_address">
	<binding variable="shop">
		<attribute name="owner.emailAddress"/>
	</binding>
</info>
The screenshots below further illustrates the additions up to this point.
Manual validation using an if statement and alert is required as model validators are not supported for relationships.
One to Many Relationships
For a many to one relationship each shop can have multiple owners. We will keep the relationship on the Shop object. We will, however, change the multiplicity and rename the relationship accordingly.
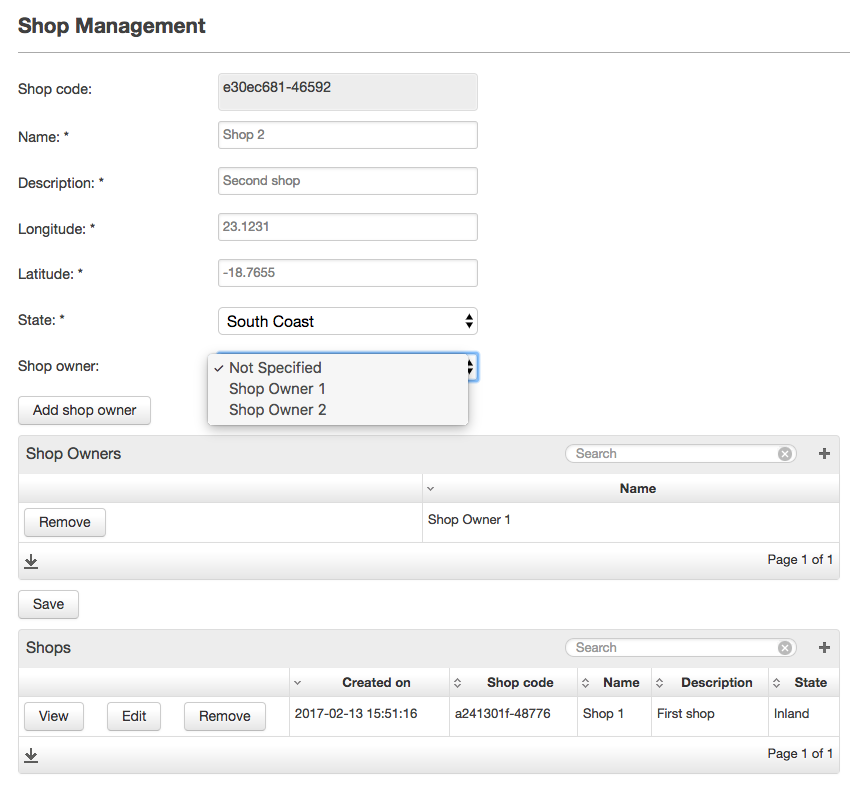
Seeing as each shop can now have more than one owner, a select box alone is not enough. In addition to a select box, we will also need a button to confirm the linking of a shop owner with a shop and a table to display the selected owners of a shop. We will include a similar table on the ShopDetails view.
First we need to make the model changes:
 persistent object Shop {
	.
	.
	.
	@OneToMany
	ShopOwner owners via shop;
}
If we were to place the relationship on the ShopOwner object at this point, we would have used the @ManyToOne annotation instead.
We can then replace the single select box on the ShopMgmt view with a select box, submit button and table as follows:
 <select label="select.shop_owner">
	<binding variable="ownerToAdd"/>
	<collectionSource function="getAllShopOwners">
		<displayAttribute name="firstName"/>
		<displayAttribute name="lastName"/>
	</collectionSource>
</select>

<submit label="submit.add_shop_owner" action="addShopOwner"/>

<table title="table_title.shop_owners">
	<collectionSource function="getCurrentShopOwners"/>
	<column heading="column_heading.name">
		<attributeName>firstName</attributeName>
		<attributeName>lastName</attributeName>
	</column>
	<rowAction label="button.remove" action="removeShopOwner">
		<binding variable="ownerToRemove"/>
	</rowAction>
</table>
The backing functions for these view components are:
// Return all shop owners in the system
ShopOwner[] getAllShopOwners() {
	return ShopOwner:equals(deleted, false);
}
// Return the shop owners that are linked to the current shop
ShopOwner[] getCurrentShopOwners() {
	return shop.owners;
}
string addShopOwner() {
	shop.owners.append(ownerToAdd);
	ownerToAdd = null;
	return null;
}
string removeShopOwner() {
	ShopOwner[] shopOwners = getAllShopOwners();
	for(int i = 0; i < shopOwners.length(); i++) {
		ShopOwner currentShopOwner = shopOwners.get(i);
		if(ownerToRemove._id == currentShopOwner._id) {
			shop.owners.remove(i);
		}
	}
	return null;
}
We can alternatively use the relationshipIn selector in the getCurrentShopOwners function to check if a relationship is set to a specific value or collection of values. In the example below the first argument is the name of the relationship and the second either an object instance or collection of object instances :
ShopOwner[] getCurrentShopOwners() {
	return ShopOwner:relationshipIn(shop, shop);
}
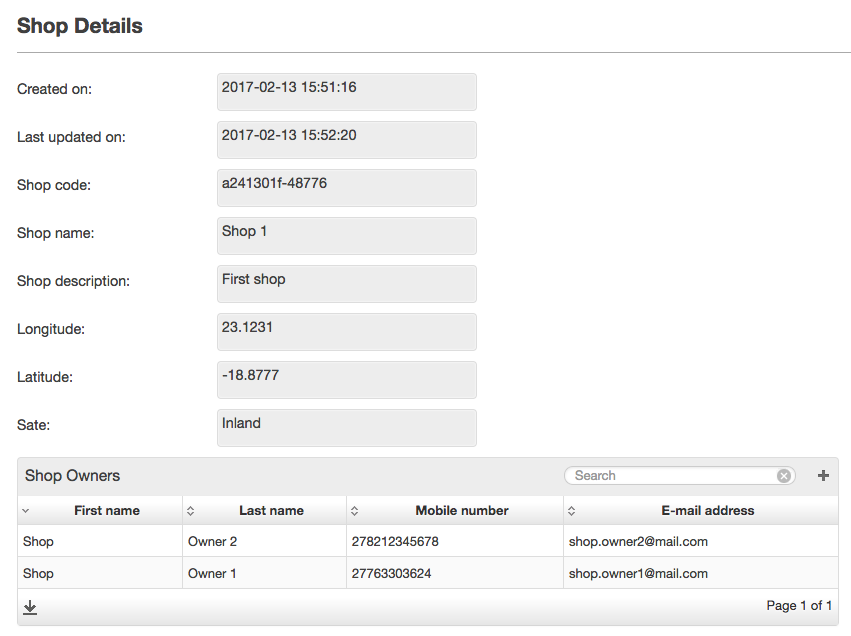
We can now also replace the info widgets on the ShopDetails view with a similar table to display the details of the owners of the shop:
 <table title="table_title.shop_owners">
	<collectionSource function="getCurrentShopOwners"/>
	<column heading="column_heading.first_name">
		<attributeName>firstName</attributeName>
	</column>
	<column heading="column_heading.last_name">
		<attributeName>lastName</attributeName>
	</column>
	<column heading="column_heading.mobile_number">
		<attributeName>mobileNumber</attributeName>
	</column>
	<column heading="column_heading.email_address">
		<attributeName>emailAddress</attributeName>
	</column>
</table>
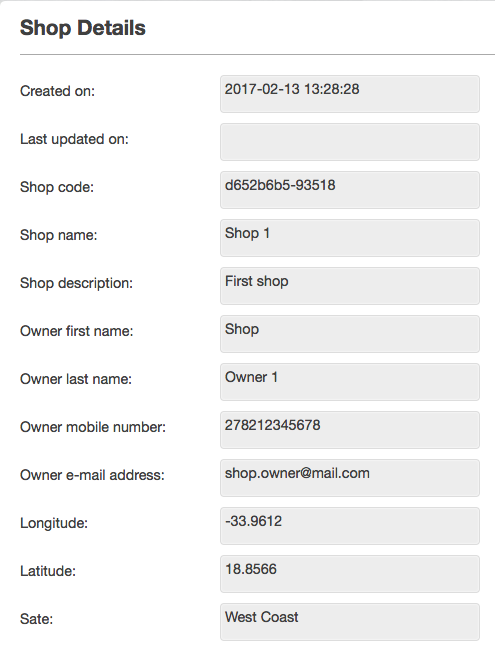
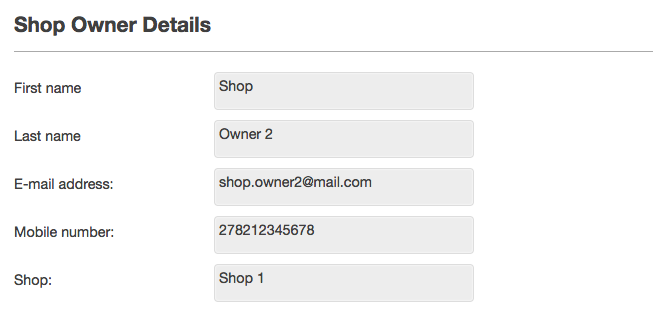
For completeness' sake we also add a info widget on the ShopOwnerDetails view to display the name of the shop of the selected owner:
 <info label="info.shop">
	<binding variable="shopOwner">
		<attribute name="shop.name"/>
	</binding>
</info>
The screenshots below further illustrates the additions up to this point.
On the "One" side of a relationship, it can be set using a normal assignment operator or binding from select box widget and cleared by setting it to null. On the "Many" side of a relationship it can be treated as a collection where append can be used to set the relationship and remove to clear it.