Lesson 05: Model Objects, Enums
As a System Administrator I want to be able to view, create, edit and delete shops.
Lesson Outcomes
By the end of this lesson you should:
- Understand the difference between role and non-role objects and how they influence CRUD (create, read, update, delete) functionality
- Understand the
date,datetimeanddecimalbasic data types in Helium - Be able to use custom
enumtypes, enum select boxes and enum translations - Be able to reference an object's internal Helium ID
- Understand the basics of implicit casting in Helium
- Be able to make use of the
String:splitandString:concatbuilt-in functions - Be able to make use of the
Math:randombuilt-in function
New & Modified App Files
./model/Enums.mez
./model/Shop.mez
./web-app/images/Shop.png
./web-app/lang/en.lang
./web-app/presenters/ShopMgmt.mez
./web-app/views/ShopDetails.vxml
./web-app/views/ShopMgmt.vxml
Non Role Object
We will first add a new model object with basic attributes to represent a shop entity in the system:
persistent object Shop {

	// Basic shop details
	@requiredFieldValidator("validator.required_field")
	string name;

	@requiredFieldValidator("validator.required_field")
	string description;

	// Meta information
	bool deleted;
}
This object is persistent but does not have an @Role annotation like the previous object that we discussed. It is therefore not related to Helium users or app user roles. We also included the use of the validator introduced in Lesson 3 to ensure that the values that will be captured are not null. In addition we re-introduce the deleted attribute that will be used to support soft delete of shops.
CRUD Functionality for Non Role Object
We can now add CRUD functionality for our new object.
This includes two views. One with a form for creating new shops and a table listing the basic attributes of the shop. The table has row actions for deleting and editing a shop as well as viewing additional shop details that will be added later in this lesson. These details are displayed on a separate view.
In addition to the views, a presenter with appropriate unit is also added. Note the differences between the CRUD functionality for shops and CRUD functionality for system admin users. There is no need to make calls to the invite and removeRole built-in functions when creating and deleting shops respectively. Abbreviated versions of the source code for these files are shown below:
<?xml version="1.0" encoding="UTF-8"?>
<ui xmlns="http://uiprogram.mezzanine.com/View"
    xmlns:xsi="http://www.w3.org/2001/XMLSchema-instance"
	xsi:schemaLocation="http://uiprogram.mezzanine.com/View View.xsd">
	<view label="view_heading.shop_management" unit="ShopMgmt" init="init">

		<menuitem label="menu_item.shop_management" icon="Shop" order="2">
			<userRole>System Admin</userRole>
		</menuitem>

		<textfield label="textfield.name">
			<binding variable="shop">
				<attribute name="name"/>
			</binding>
		</textfield>

		<textfield label="textfield.description">
			<binding variable="shop">
				<attribute name="description"/>
			</binding>
		</textfield>

		<submit label="submit.save" action="saveShop"/>

		<table title="table_title.shops">
			<collectionSource function="getShops"/>
			<column heading="column_heading.name">
				<attributeName>name</attributeName>
			</column>
			<column heading="column_heading.description">
				<attributeName>description</attributeName>
			</column>

			<rowAction label="button.view" action="viewShop">
				<binding variable="shop" />
			</rowAction>
			<rowAction label="button.edit" action="editShop">
				<binding variable="shop" />
			</rowAction>
			<rowAction label="button.remove" action="deleteShop">
				<binding variable="shop" />
				<confirm subject="confirm_subject.removing_shop" body="confirm_body.removing_shop" />
			</rowAction>
		</table>
	</view>
</ui>
<?xml version="1.0" encoding="UTF-8"?>
<ui xmlns="http://uiprogram.mezzanine.com/View"
    xmlns:xsi="http://www.w3.org/2001/XMLSchema-instance"
	xsi:schemaLocation="http://uiprogram.mezzanine.com/View View.xsd">
	<view label="view_heading.shop_details" unit="ShopMgmt">
		<action label="action.back" action="back" />

		<info label="info.shop_name">
			<binding variable="shop">
				<attribute name="name"/>
			</binding>
		</info>

		<info label="info.shop_description">
			<binding variable="shop">
				<attribute name="description"/>
			</binding>
		</info>
	</view>
</ui>
unit ShopMgmt;

Shop shop;
bool editing;

void init() {
	shop = Shop:new();
	editing = false;
}

Shop[] getShops() {
	return Shop:equals(deleted, false);
}

DSL_VIEWS saveShop() {
	shop.deleted = false;
	shop.save();
	init();
	return null;
}

DSL_VIEWS viewShop() {
	return DSL_VIEWS.ShopDetails;
}

DSL_VIEWS back() {
	return DSL_VIEWS.ShopMgmt;
}

DSL_VIEWS editShop() {
	editing = true;
	return null;
}
DSL_VIEWS deleteShop() {
	shop.deleted = true;
	init();
	return null;
}
Retrieving the Current Date And Time
Consider a use case where we would like to keep track of when a shop was created and last updated for auditing purposes. Helium provides date and datetime data types and various built-in functions to retrieve the current date and time. Firstly we will add the appropriate attributes to our Shop model object. We will add two attributes of type datetime:
datetime createdOn;
datetime updatedOn;
If we were only interested in the date, we could have used the date data type instead:
date createdOn;
date updatedOn;
We can now modify the logic in our ShopMgnt unit to record the time when a shop is created and updated using the Mez:now built-in function. The only changes that are required is in the saveShop function:
DSL_VIEWS saveShop() {
	if (editing == true) {
		// When editing we record the current time
		shop.updatedOn = Mez:now();
	}
	else {
		// When saving for the first time we record the current time
		shop.createdOn = Mez:now();
		shop.deleted = false;
		shop.save();
	}

	init();
	return null;
}
Enum and Decimal Types
In addition to the functionality thus far, we also want to keep track of the location of the shop. We will use three new data model attributes to achieve this. The first two will be of type decimal and will represent the GPS longitude and latitude coordinates of the shop:
@requiredFieldValidator("validator.required_field")
decimal longitude;
@requiredFieldValidator("validator.required_field")
decimal latitude;
In addition to adding these two attributes to the data model, we also need to add two new text fields to our ShopMgmt view:
<textfield label="textfield.longitude">
	<binding variable="shop">
		<attribute name="longitude"/>
	</binding>
</textfield>

<textfield label="textfield.latitude">
	<binding variable="shop">
		<attribute name="latitude"/>
	</binding>
</textfield>
Using these types of attributes to display markers on a map is discussed in Lesson 15.
The third and final attribute for keeping track of a shop location will represent the municipal region that the shop falls into and will be represented using a custom enum.
Firstly we must declare the custom enum. To do this we create a new mez file in our model folder named Enums.mez and we add the following code:
enum STATES {
	West_Coast,
	South_Coast,
	Inland
}
Note the use of upper case for the enum identifier. This is required by Helium and failing to use upper case will result in a compile error. Enum values also cannot contain any white space characters. The use of underscores is allowed.
This enum type can then be used in our Shop model object as follows:
@requiredFieldValidator("validator.required_field")
STATES state;
Enums types have to have all capital names and no white space is allowed for enum values.
Making Use Of a Select Box
For this use case we will populate the enum value using a select box on our view. We do this by adding the following to our view:
<select label="select.state">
	<binding variable="shop">
		<attribute name="state"/>
	</binding>
	<enum>STATES</enum>
</select>
The example above, shows a select box specifically for enums. Select boxes can also be used to select objects or basic data type values. In these cases a collection source needs to be provided. This is discussed in Lesson 6.
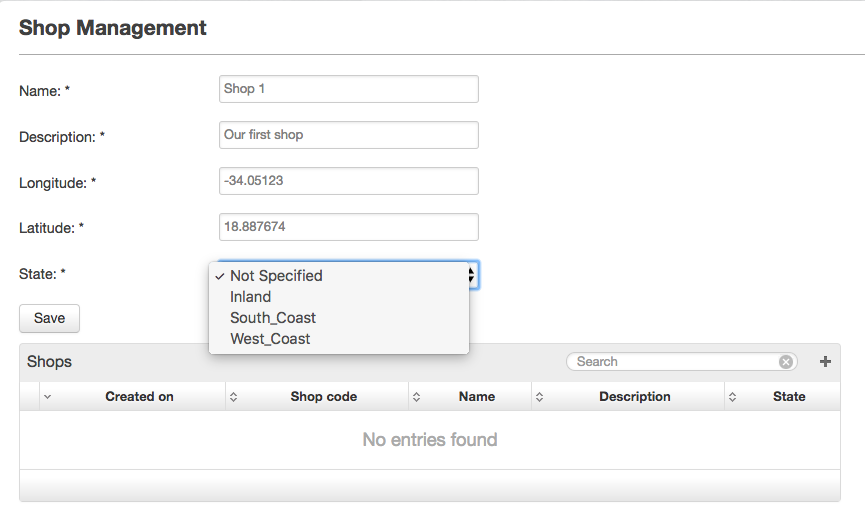
When running the application the following will be seen when selecting a state from the frontend:
Enum Translations
Enum values are hardcoded in application source code which poses two problems.
- The application frontend needs to be potentially translated to different languages without making changes to units or views
- The Helium DSL syntax rules does not allow for user friendly enum values
It is for this reason that enum values can be translated using entries in a lang properties file. In this case we can add the following to our en.lang properties file:
enum.STATES.West_Coast = West Coast
enum.STATES.South_Coast = South Coast
enum.STATES.Inland = Inland
The keys for enum translations must conform to the format shown in the examples above. Keys should contain the word enum followed by the enum name followed by the enum values.
Referencing an Object's Internal ID
Helium uses uuids as ids for internal representation of objects. In some cases it can be useful to make use of these within the applications too. For this reason Helium provides a uuid basic data type and also allows developers to reference the internal object ids as an implied attribute. This is demonstrated below:
Shop shop = Shop:new();
uuid shopInternalId = shop._id;
Generating Random Decimal Values
The Helium DSL provides the Math:random built-in function for generating random decimal values. The generated value is always between 0 and 1. See the usage example below:
decimal randomNum = Math:random();
Various other built-in functions are available in the Math namespace. Some of these are discussed in later lessons and all are listed as part of the Helium Quick Reference.
Making Use Of String Built In Functions
The Helium DSL provides various built-in functions for string manipulation. These are available through the Strings namespace and include the Strings:concat and Strings:split functions. See below for example usage.
// split "Hello World" into "Hello" and "World"
string[] result = String:split("Hello World", " ");
// concatenate "Hello" and "World" into "Hello Word"
string result = String:concat("Hello ", "World");
Various other built-in functions are available in the Strings namespace. Some of these are discussed in later lessons and all are listed as part of the Helium Quick Reference.
Type Conversion and Implicit Casting
The Helium DSL provides a variety of type conversion mechanisms for type conversion of basic data types. This is mainly achieved using built-in functions and implicit casting. Some examples are shown below.
A comprehensive list of possible data type conversions is listed in the Helium Quick Reference.
Object UUID, Random Decimal and String Built In Functions Example
Now that we have briefly discussed internal object id's and how to reference them, random decimal values, string built-in functions and implicit casting, we have all the tools we need to generate a random shop code with which to uniquely identify shops in a more user friendly way than simply using the internal ids. We will represent the code as a string attribute on our Shop object:
string shopCode;
We will add a helper function to our ShopMgmt unit to generate codes. In addition we need to modify our init function to assign the generated code to shops when they are initialized.
string generateShopCode() {
	string shopId = shop._id;
	string[] idParts = String:split(shopId, "-");
	int randomNumber = Math:random() * 100000;
	return String:concat(idParts.get(0), "-" ,randomNumber);
}
void init() {
	shop = Shop:new();
	shop.shopCode = generateShopCode();
	editing = false;
}
A line by line description of the generateShopCode function follows:
- Line 2: We reference the shop object's internal id as a starting point and cast it to a string by assigning it to a
stringvariable - Line 3: We split the internal id string on the "-" character and assign the result to a string array
- Line 4: We generate a random
decimalnumber between 0 and 1, multiply it by 100000 and then cast it to an integer by assigning it to a variable of typeinteger. The result is a random integer value between 0 and 99999 - Line 5: Lastly we concatenate the first part of the split internal id and the randomly generated number and return the result