Lesson 12: Payments, Widget Visiblity

As a Farmer I want to purchase items from a shop and make payments using the Helium app.


Lesson Outcomes

By the end of this lesson you should:

  • Be comfortable using visibility bindings to hide and show view components based on unit variables and functions
  • Know what is required in order to make payments from an app and to track the status of these payments
  • Know how to use the pay and payWithRef built-in functions
  • Know how to use payment callback functions
  • Know how to trigger a manual payment status request to the payment aggregator


App Use Case Scenario

The app use case for this lesson is that a farmer would like to make purchases from a specific shop using the application. This includes making a payment to the shop using the Helium payment framework.

Firstly, a farmer will select a shop and use a submit button to confirm his selection. The view will then be updated to display a table of all the stock items that a shop has in stock. This includes the name of the item, the current stock level and the current unit price for the stock item. The farmer will then select a stock item using a row action on this table.

Once this selection has been made, the view will again be updated to include info widgets showing the currently selected stock item, its stock level and unit price as well as a text field where the farmer can specify the quantity of the item he would like to purchase. Another submit button to calculate the total cost of the selection can then be pressed.

Once this has been done additional view components appear. These components describe a summary of the price for the goods, the discount offered if the farmer has previously uploaded a government assistance certificate and the final cost to the farmer. Once the farmer confirms this, the payment will be recorded and sent to Helium for processing using the payment framework.


New & Modified App Files

The files in the tutorial app that were modified or added as part of this lesson are as follows:

./model/objects/Shop.mez

./model/objects/FarmerPurchase.mez

./web-app/presenters/farmer_ops/FarmerPurchases.mez

./web-app/views/farmer_ops/HistoricFarmerPurchases.vxml

./web-app/views/farmer_ops/NewFarmerPurchase.vxml

./web-app/views/user_management/ShopOwnerDetails.vxml

./web-app/views/user_management/ShopOwnerUserMgmt.vxml

./web-app/lang/en.lang

./services/PaymentCallbacks.mez


Data Model Additions for Farmer Purchases

Only two additions to our data model is required. Firstly, an object to keep track of purchases made by farmers. This object needs to keep track of the purchase details such as item that was purchased, unit cost, discount and final cost. It also needs to keep track of the internal Helium payment status and id. This is discussed further later in this lesson. Further more, the object also needs to keep track of the farmer, shop and stock item that was involved in the transaction.

persistent object FarmerPurchase {
	
	// When was the purchase made
	datetime purchasedOn;
	
	// Quantity and cost of purchase
	int quantity;
	decimal unitPrice;
	decimal goodsCost;
	decimal discount;
	int finalCost;
	
	// Helium provided payment status and id
	datetime paymentStatusUpdatedOn;
	PAYMENT_STATUS paymentStatus;
	uuid paymentId; 
	
	// Stock item that was purchased
	@ManyToOne
	Stock stock via purchases;
	
	// Farmer that made the purchase
	@ManyToOne
	Farmer farmer via purchases;
	
	// Shop at which purchase was made
	@ManyToOne
	Shop shop via purchases;
}

Lastly, we also need to add a mobile number attribute to the Shop object. This is required for making payments to a specific shop.

@requiredFieldValidator("validator.required_field")
string mobileNumber;


Overview of View and Unit Additions for Making Purchases

For the implementation of this feature we have added the NewFarmerPurchase view. This view has a menu item for the farmer role and is thus accessible from the main app menu. This single view will be used by the farmer to perform purchases from specific shops.

In addition a view containing all historic records, namely HistoricFarmerPurchases, is also added and is accessible from an action button on the NewFarmerPurchase view.

These two views are backed by the FarmerPurchases unit.


Widget Visibility

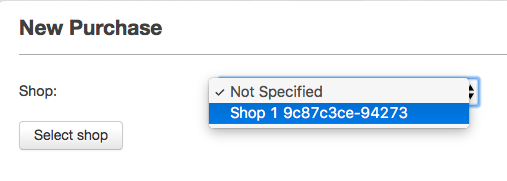
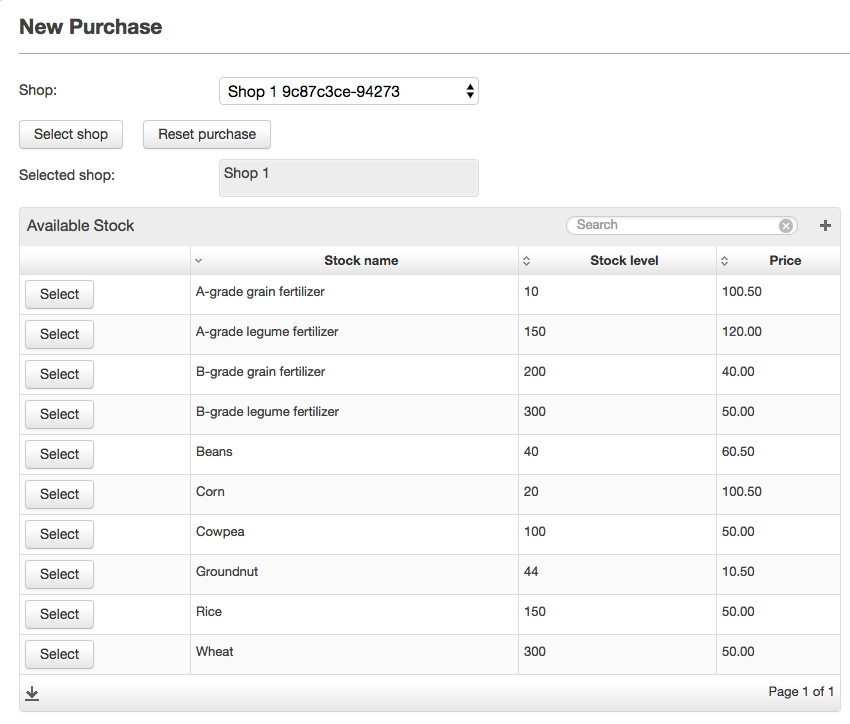
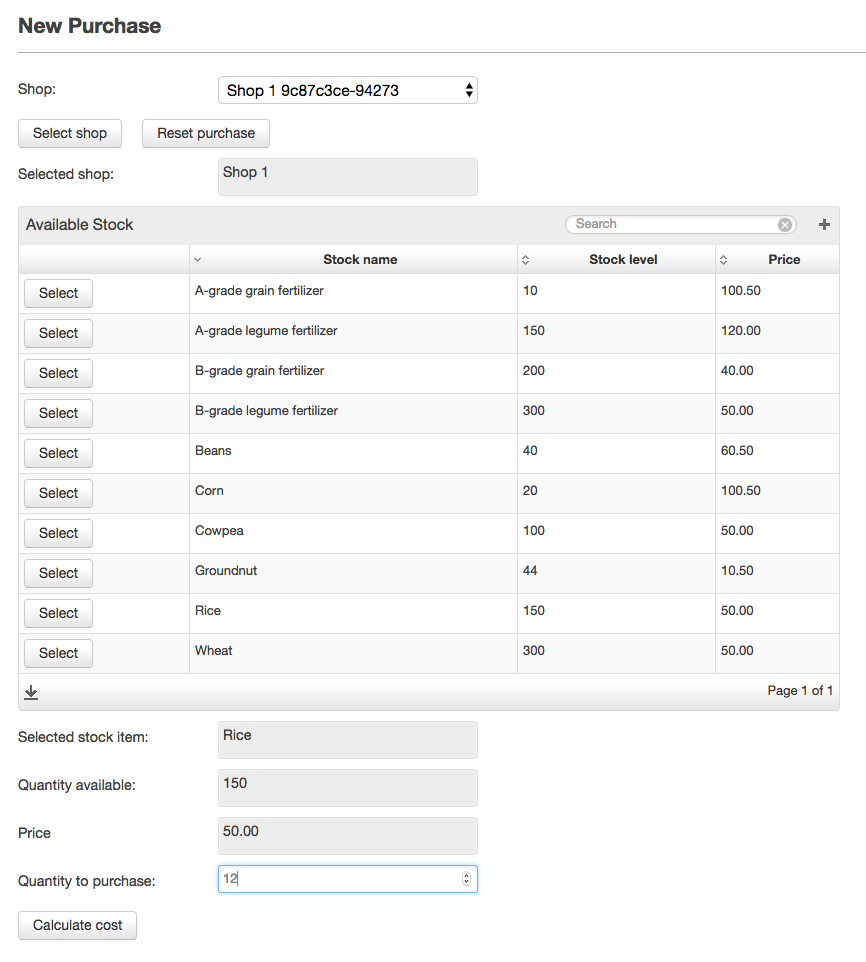
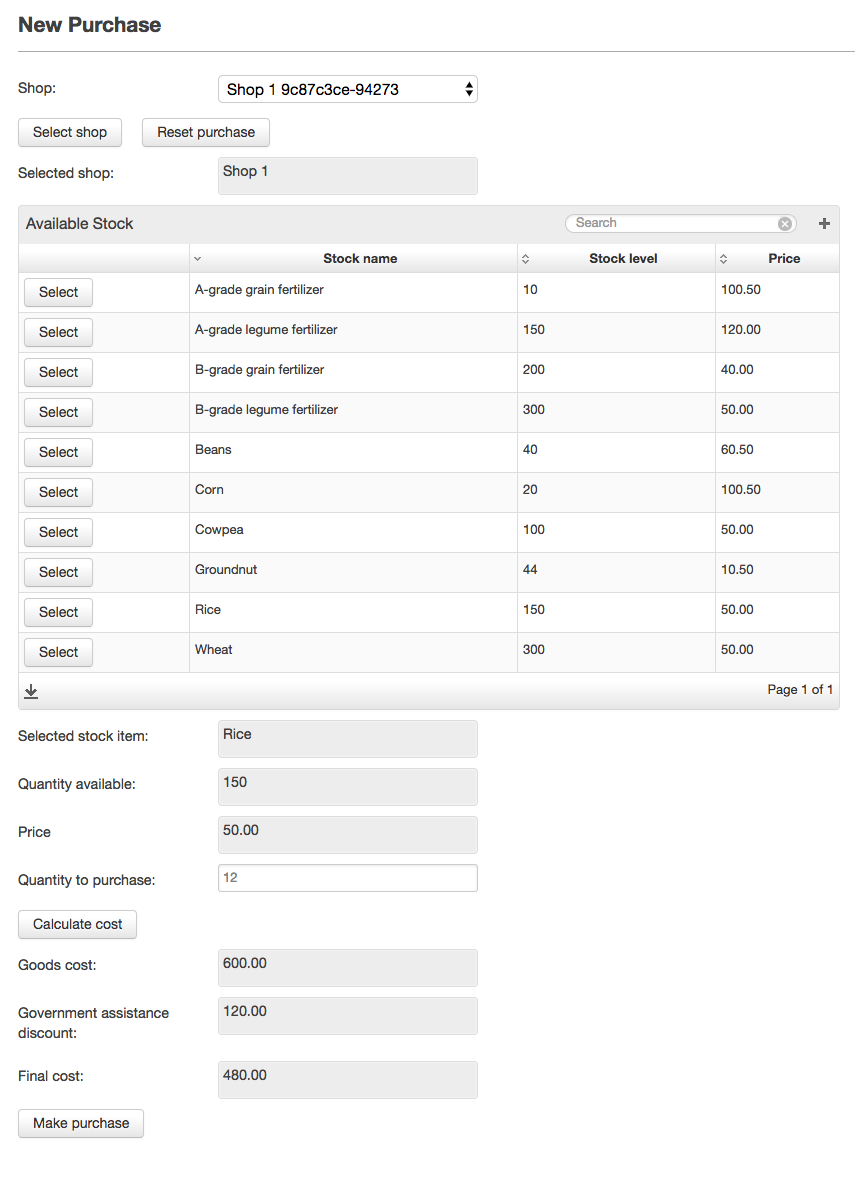
As mentioned in the scenario that accompanies this lesson, we will have multiple stages within the flow of the purchase feature. Despite this we will only be using one view. After each stage, more view components become visible to the user. This is achieved using visible function bindings. The following code snippet shows the functions that are used for these bindings:

// Once a shop has been selected, the stock items for this shop can be displayed
bool showStockTable() {
	if(shop == null) {
		return false;
	}
	return true;
}

// Once a stock item has been selected is can be displayed with a text field for the quantity to purchase
bool showPurchaseForm() {
	if(showStockTable() == false || selectedStock == null) {
		return false;
	}
	return true;
}

// Once the purchase quantity has been validated and the price calculated the cost summary can be displayed
bool showSummary() {
	if(showPurchaseForm() == false || goodsCost == null) {
		return false;
	}
	return true;
}

// In the case of a farmer with a government assistance certificate the discount related to this should 
// also be shown as part of the final cost summary
bool governmentAssitanceApplicableAndSummary() {
	if(showSummary() == false || farmer.governmentAssistanceCertificate == null) {
		return false;
	}
	return true;
}

The screenshots below show the difference stages of widget visibility for the NewFarmerPurchase view:

Be careful when using visibility bindings on all your view components. If they all evaluate to false your view will fail to load instead of simply showing an empty view.


In cases where values are bound directly to primitive unit variables instead of model attributes, be sure to include manual validations using the Mez:alert functions seeing as data model validators cannot be used.


Pay Built-In Functions

Once we have done all we need to do in our app to prepare for a payment the payment can be submitted to Helium by making a call to the pay built-in function. The following code snippet demonstrates this:

farmerPurchase.paymentId = farmer.pay(shop, "KES", farmerPurchase.finalCost);

In the code snippet above the farmer is the payer and the shop is the payee. Both the payer and payee needs to have an identifier. Depending on the Helium configuration for payments in the app this can be a so called "MSISDN". In our case, we have mobile number attributes on both the farmer and shop objects.

"KES" represents the currency for the payment. In this case, Kenya shilling.

The amount that is being payed is retrieved from the finalCost attribute on our farmerPurchase object instance. Note that this has to be an integer value.

The pay function returns a uuid that represents the internal Helium id for the payment. This, along with the @OnPaymentUpdate annotation discussed later in the lesson, can be used to track the payment status in the app.

Outside of the actual DSL app, the Helium core app also provides a view showing payments submitted through Helium apps. This view can be used to reconcile any payments with the appropriate mPesa or other payment accounts that are in use.

In order to provide a reference between the payment as shown on this view and the payment in the app a further reference and message can be used.

Suppose we have an in app id for our purchase such as the Helium id for the FarmerPurchase object that we would also like to present as an additional unique reference for the payment. In addition we want to add the shop where the purchase happened as a non unique message to the Helium payment. This can be achieved using the payWithRef function:

farmerPurchase.paymentId = farmer.payWithRef(
	shop, "KES", farmerPurchase.finalCost, farmerPurchase._id,
	Strings:concat(shop.name, " - ", shop.shopCode)
);

Using the payWithRef function above, farmerPurchase._id represents the additional reference and the concatenated string represents an additional message. The message can also be left out by simply specifying an empty string literal. 


Note that some configuration is required in order for your Helium user to have access to the payment recon screen for specific apps and accounts. In order to grant a Helium user access to the payment recon screen please follow the process described here. Note that this request should only be made for production ready and production apps.

Payment App Configurations

Note that some configuration is required in order for apps to be enabled to make payments. Although this configuration will not be needed for the tutorial app, it might be necessary for future apps that you develop. In order to request this configuration, follow the process as described here. For the purpose of this tutorial it does make sense, however, to have a look at what such a configuration requires as it gives an insight into how payment functionality in your app can be designed to support future use cases, such as multiple M-Pesa accounts being used per app.

It is also worth noting that with no configuration set, your app will generate exceptions at runtime when attempting to invoke the pay or payWithRef built-in functions.


@OnPaymentUpdate Annotation for Payment Callback Functions 

Helium processes payments asynchronously. This means that a result of a call to the pay function will not be immediately available.

Helium provides a mechanism whereby an app function can be declared as a callback that will be invoked once Helium has an update on the payment status. This is implemented by means of the @OnPaymentUpdate annotation. Such a callback for payments made without an additional reference is included in the app in the PaymentCallback unit under the services folder:

@OnPaymentUpdate
void paymentUpdate(uuid id, PAYMENT_STATUS status, string message){
	
	// Find the associated purchase based on the internal Helium payment ID
	// Ids should be unique so we are only expecting one purchase in the resulting collection
	FarmerPurchase[] farmerPurchases = FarmerPurchase:equals(paymentId, id);
	
	if(farmerPurchases.length() >= 0) {
		FarmerPurchase farmerPurchase = farmerPurchases.first();
		
		// Update the payment status maintained on the farmer purchase
		farmerPurchase.paymentStatus = status;
		
		// Record the time stamp of the update
		farmerPurchase.paymentStatusUpdatedOn = Mez:now();
	}
}

For payments that were made with an additional reference we can change the function signature as follows:

@OnPaymentUpdate
void paymentUpdateWithRef(uuid id, string reference, PAYMENT_STATUS status, string message){
	.
	.
}

The HistoricFarmerPurchases view shows the purchase details for historic purchases including payment statuses as updated using the callback functions above. The screenshot below demonstrates this:

The payment status, as updated using the callback function, is Failed_Validation in this case. This is to be expected though as no configuration for the routing of payments in our app has been set. A summary of the possible statuses and their meanings follows in the next section.


Payment Validation Flow

The payment driver can implement and optional payment validation flow.

In payment validation flow the payment instruction get sent to the payment gateway - the payment status is set to "Instructed" and Helium wait on a validation response from the payment gateway. 

"Instructed" will show a description of "Payment Initiated. Awaiting validation"

This response is an additional step to verify / validate the payment instruction to prevent invalid payments where for example the amount being paid doesn't match the original instructed request.

Two additional payment statuses indicated if the validation is successful or failed. 

The DSL application can implement specific logic to decide what todo in the case of a failed validation.

Once the successful payment validation is received then an optional successful Result_Received callback can be received to confirm that the payment has been successful.


Payment Statuses

StatusDescription
Pending

An initial state indicating that the call to a pay function from the DSL application has been submitted and correctly interpreted by the back-end.

RegisteredThe payment has been received by the Helium payment framework and is being processed.
Failed_ValidationProcessing of a payment contains a step where the provided information used in routing of the payment is validated. In some cases payments can use one of multiple accounts. If, during this step, the configuration for the application is read and applied and no matching account is found, the "Failed_Validation" status is returned.
Promise_To_PayThe payment is confirmed to be valid and routable and, bar any network or other technical failures, will be paid.
InstructedCommunication has been completed between Helium and the payment gateway.
Payment_Validation_SuccessfulIndicate that payment validation is successful on payment validation flow.
Payment_Validation_FailedIndicate that payment validation failed on payment validation flow. The message indicate the event code and description.
Result_ReceivedA result has been received from the payment gateway for processing the status.
ConfirmedConfirmed from the payment gateway result that the payment was a success.
ManualConfirmed from the payment gateway result that payment was a failure.

In addition to the above, there are also internal statuses which generally should not be presented to the DSL app. In some cases though payment failure edge cases might result in these statuses being posted back to the DSL app. Most notably a status of DEFERRED might be due to a certificate issues when connecting to the payment gateway.


Manual Payment Status Requests

Triggering a Payment Status Request

Some payment aggregators are not able to reliably send payment status callbacks to Helium. In such cases payments wil at most progress to the Instructed state. This means that Helium has successfully sent the payment request to the aggregator, but no further update has been received from the aggregator.

In order to work around this issue, the Helium DSL provides a built-in function that can trigger a payment status request to the aggregator:

Mez:requestPaymentStatus(paymentId)

This will trigger a payment status request that is handled asynchronously in the Helium platform. Once a response is received from the aggregator Helium will post that payment status back to the DSL app using the existing mechanism that makes use of the __payment_status_record__ and __payment_with_ref_status_record__ (depending on which built-in function that was used to trigger the payment itself) tables and the @OnPaymentStatusUpdate annotation.

In the code snippet above, the paymentId value that is sent as argument is the value that is returned by the built-in payment functions. This id represents the value for the _id_ column in the __payment_status_record__ and __payment_with_ref_status_record__ tables that are automatically included in all app schemas.

Note that a payment status request can only be triggered if the following is true:

  • If commId in the __payment_status_record__ and __payment_with_ref_status_record__ tables has been populated. The commId column represents a unique communication id between Helium and the aggregator and this value will only be available if the initial payment request to the aggregator was successful.
  • The payment was made using a payment driver that also has support for triggering payment status requests. At the time of writing this functionality is only available for the MTN MoMo payment driver. More support will be added in future.

Payment Status Request Tracking

Since the payment status request made to an aggregator is a separate API call that might fail or succeed independently from the actual payment request itself, the DSL provides a mechanism through which the success of the status request can be tracked.

This is achieved by:

  • a built-in object and related app schema table namely __payment_status_request_result__
  • a callback annotation, @OnPaymentStatusRequestResultUpdate , that receives an instance of the above object from Helium

See below for reference:

@NotTracked
persistent object __payment_status_request_result__ {
    datetime datetimestampStarted;
    datetime datetimestampFinished;
    int attempt;
    bool success;
    string description;
    bool doneProcessing;
    uuid paymentId;
    string commId;
}
@OnPaymentStatusRequestResultUpdate
void processStatusRequestResultUpdate(__payment_status_request_result__ update) {
  ...
}

To reiterate, the above does not represent the payment status itself, but the status of the payment status request.


Lesson Source Code

Lesson 12.zip