Lesson 01: A Basic Helium App

As a System Admin I want to see a welcome page with my details when I log into the app.


Lesson Outcomes

By the end of this lesson you should:

  • Have an understanding of the folder structure for Helium apps
  • Have a general understanding of the design of a Helium app
  • Be able to create a basic Helium app
  • Be able to compile and deploy a basic app


Adding an Object

As a first step we will add a file named SystemAdmin.mez to the model folder. For an overview of how the model folder fits into a DSL project, along with other folders that will be created in later sections of this tutorial, see the additional documentation provided here. Note the use of the mez extension in our SystemAdmin.mez model file. This is used for all Helium script files. This includes files containing data model objects and units. Note that while it is required that model files be placed under the model folder, there is no limitation to the use of subfolders within the model folder. Using subfolders to logically organise your model files is recommended practice.

We can now add the following code to our newly created file to define the object:

SystemAdmin object
persistent object SystemAdmin {
	string firstName;
	string lastName;
	string mobileNumber;
	string emailAddress;
}

Although it is recommended, it is not required to name the file and object within the file similarly. Note the optional use of the persistent keyword in the object definition. This implies that Helium will create a database table for the object. All instances of the object that we save will be stored as a record in this table. Alternatively this can be omitted in which case all instance of the object will only be kept in memory.

In the example above, all attributes have type string. This is a basic data type in Helium and represents a string of characters. For a reference to the different basic data types please refer to the Quick Reference.


Use subfolders to logically organise the model files in your app.

Maintain consistency between your model file names and model object names.

Adding a User Role

The object that we have created will be used to represent details of a specific user role namely the "System Admin" role. In order for Helium to recognize this we need to use the @Role annotation and also specify a name for the role. Note that there is no restriction for the role name to be similar to the object name although it is recommended practice. Also take note that the role name, as specified using the @Role annotation, will be displayed to users on the frontend. It is therefore recommended to avoid camel case, underscores and other programming notation for role names. See the code example below.

SystemAdmin object with @Role annotation
@Role("System Admin")
persistent object SystemAdmin {
	string firstName;
	string lastName;
	string mobileNumber;
	string emailAddress;
}

Note that adding the @Role annotation to an object implies that it will be persistent whether the persistent keyword is present or not.


Keep roles names and object names similar.

Avoid programming notation for role names as they will be displayed to users on the frontend.

Objects with the @Role annotation are implied to be persistent.

Adding a View

Next we need to add a view for the "System Admin" role that was added in the previous step. To do this create a view file named SystemAdminHome.vxml inside the web-app/views folder. Once again, there is no restriction on the use of subfolders within the views folder. View file names have to be unique. Add the following to the view file:

Empty view file
<?xml version="1.0" encoding="UTF-8"?>
<ui xmlns="http://uiprogram.mezzanine.com/View" 
    xmlns:xsi="http://www.w3.org/2001/XMLSchema-instance"
	xsi:schemaLocation="http://uiprogram.mezzanine.com/View View.xsd">
	<view label="view_heading.system_admin_home">
	</view>
</ui>


Use subfolders to logically organise the views in your app.

View file names must be unique.

Creating and Using a Language File

Note that the view file added in the previous step contains the following:

View label
<view label="view_heading.system_admin_home">

This indicates that the view title references an entry in a properties file with the key view_heading.system_admin_home. This properties file needs to be created under the lang folder and an entry needs to be added for this key. For now we will only add a default properties file with name en.lang. Multiple properties files can, however, be added here where each one represents a different language. Helium will then use the lang files, the property key and the locale of the current user to retrieve the values that need to be displayed on the frontend. The example below shows our key and value for the view title as found in the default properties file named en.lang.

view_heading.system_admin_home = System Admin Home


Keep properties files organized and decide on a naming scheme for keys in these files.

The translation entries declared in the DSL app source code can be overridden at runtime, for more information please see Helium Translation Overrides

Adding a Menu Item

The menu item defines an entry point to the view, specifically for the "System Admin" role in this case. One can also specify the index of the menu item in the menu starting at index 0 as well as a custom icon. Icons are located in the images folder and are referenced in the menu item using the file name without extension. A lang file entry for the menu item name also needs to be added. It is also possible to have more that one menu item per view which represents menu items for the same view but different roles. With a menu item added our view is now as follows:

View with menu item
<?xml version="1.0" encoding="UTF-8"?>
<ui xmlns="http://uiprogram.mezzanine.com/View" 
    xmlns:xsi="http://www.w3.org/2001/XMLSchema-instance"
	xsi:schemaLocation="http://uiprogram.mezzanine.com/View View.xsd">
	<view label="view_heading.system_admin_home">
		
		<!-- Menu item for System Admin role -->
		<menuitem label="menu_item.system_admin_home" icon="UserProfile" order="0">
			<userRole>System Admin</userRole>
		</menuitem>
	</view>
</ui>

Note: Add a profile icon under web-app/images called UserProfile. (Look in given source code for images like this.)


The following entry, representing our menu item label, is also added to our en.lang properties file:

Menu item label
menu_item.system_admin_home = System Admin Home


The menu item shown in this lesson shows the most basic and common usage of a menu item. For an advanced example of how dynamic values can be used to represent the user roles, icon, label and preferred order of a menu item, please consult the following reference documentation: Advanced Menu item Usage


The recommended format for icons is a width of 40 pixels with a height of 30 pixels (or larger but with the same aspect ratio) png images with an alpha channel included.

Adding a Simple Info Widget

The info widget is used in this context to display a label and accompanying static message on the view. Both the label and message needs to be added to the en.lang properties file. With the info widget added, our view is now as follows:

View with basic info widget
<?xml version="1.0" encoding="UTF-8"?>
<ui xmlns="http://uiprogram.mezzanine.com/View" 
    xmlns:xsi="http://www.w3.org/2001/XMLSchema-instance"
	xsi:schemaLocation="http://uiprogram.mezzanine.com/View View.xsd">
	<view label="view_heading.system_admin_home">
		
		<!-- Menu item for System Admin role -->
		<menuitem label="menu_item.system_admin_home" icon="UserProfile" order="0">
			<userRole>System Admin</userRole>
		</menuitem>
 
		<!-- Info widget to display message from language file -->
		<info label="info.welcome" value="info.system_admin_welcome"/>
	</view>
</ui>

Our en.lang properties file now also contains the following two entries:

Info widget properties
info.welcome = Welcome:
info.system_admin_welcome = Welcome System Admin


Adding a User Invitation Function

Helium users can be invited to an app in the following ways:

  • Through a Helium app using the invite built-in function.
  • Through the Helium core app web portal.
  • Being invited as an initial user through the HeliumDev client.

For the first method, the app developer is responsible for creating an object instance associated with the user and manually calling the invite built-in function. This function is discussed in detail in a later tutorial lesson. This is usually done dynamically using data captured from a form in the Helium app.

The last two methods requires an invite function. For this the developer is responsible for providing a function that returns an instance of the object associated with the user role. In this case an instance of the SystemAdmin object. Due to the context from which these functions are executed developers usually hard code attribute values or generate them on the fly. This method is therefore only valid for users used for testing. To add such a method, create a new file called UserInvite.mez under the services folder and add the following content to the file:

@InviteUser function
unit UserInvite;

@InviteUser
SystemAdmin inviteSystemAdmin() {
	SystemAdmin systemAdmin = SystemAdmin:new();
	systemAdmin.firstName = "Test";
	systemAdmin.lastName = "User";
	systemAdmin.mobileNumber = "278212345678";
	systemAdmin.emailAddress = "user@domain.com";
	return systemAdmin;
}

Ignore the use of unit for now. This is discussed in detail later in this lesson. The function that was added makes use of the @InviteUser annotation. This marks it as a special function that Helium will use to invite users to the app when using the Helium core web app or the HeliumDev client.

The first line makes use of a special built-in function:

new built in function
SystemAdmin systemAdmin = SystemAdmin:new();

This line uses the new built-in function to initialize a new instance of the SystemAdmin object and assigns it to a variable. Note that usage of the new built-in function is only required for objects and not basic data types.

After initializing the object instance, the attribute values are hard coded. Finally, a return statement is used to return the populated SystemAdmin object instance. The return keyword functions the same as in many other programming languages including Java and C.


Compiling and Running the App

The application is now ready to be tested. First, test that it compiles. To do this start the HeliumDev client and use the build command. The following output can be expected:

Build command output
he-dev> build
Loading source files...
Compiling the application...
The project "helium-tut" compiled successfully
The last command completed in 0.18 seconds

Consider a scenario where we forgot to add the lang file properties for our info widget. Using the build command in that case would result in the following output:

Example compile error
he-dev> build
Loading source files...
Compiling the application...
|-----------------------------------------------------------------------------------------------------------------------------------------|
| The module "Web" generated the following warnings                                                                                       |
|-----------------------------------------------------------------------------------------------------------------------------------------|
| #     | Message                                                                                                                         |
|-----------------------------------------------------------------------------------------------------------------------------------------|
| 1     | [:-1] The translation statement's key info.system_admin_welcome does not exist in the translation for locale en                 |
| 2     | [SystemAdminHome:17] The translation statement's key info.welcome does not exist in the translation for locale en               |
| 3     | [SystemAdminHome:17] No translation exists for key info.welcome and locale en used for the text output widget's label           |
|-----------------------------------------------------------------------------------------------------------------------------------------|
The last command completed in 0.07 seconds

The detail provided by the error messages can then be used to debug and fix the issues. In this case it's clear that we are missing two entries in our en.lang properties file.

Once we are happy that the application compiles, we can deploy a snapshot app. To do this use the run command. When prompted for a pin, enter the pin that was previously set when configuring the HeliumDev client. Note that the run command also compiles the application before creating a new snapshot. It is therefore not necessary to use the build command each time before using run. The build command is useful to ensure that the app builds when you do not necessarily intend on deploying it immediately.

It's best practice to use the build command often to ensure that your application is still without compile errors. Debugging multiple errors is significantly more difficult that fixing issues one at a time as they appear.

The following output from the run command can be expected:

Run command output
he-dev> run
Loading source files...
Compiling the application...
The project "helium-tut" compiled successfully
Deploying a sandboxed instance of "helium-tut" to the "localhost" server
Loading source files...
Publishing a new release of "helium-tut" to the "localhost" server
A sandboxed instance of "helium-tut" has been deployed to "localhost".  You can access this instance at: 
http://jm.stb.mezzanineware.com/web-client/app?appId=d873e589-41bb-474f-97e5-ad8f980c1214&roleName=System+Admin
The last command completed in 1.11 seconds

Take note of the app id in the url that is displayed after running the app. In this case, d873e589-41bb-474f-97e5-ad8f980c1214. This id is needed to uniquely identify your app and is necessary when making any support requests or when using the Helium Logging Service. For reference, the documentation here provides general instructions on how to obtain the app id should it be needed.

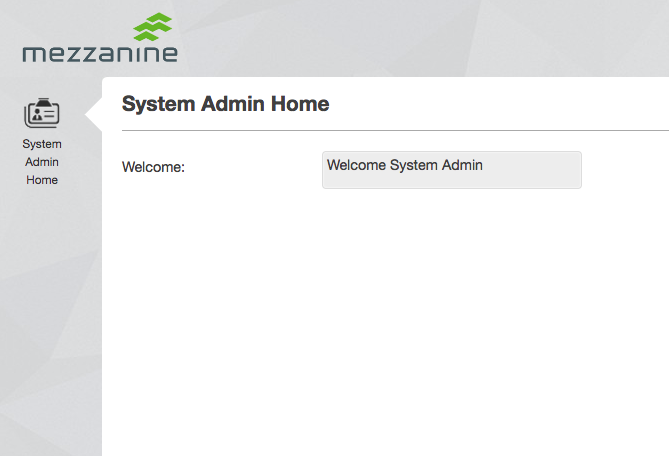
Using the provided url, access the app. You should be presented with a view similar to the screenshot below.


If you experience a runtime exception or error at any point when testing your app, the Helium Logging Service can be used to help with debugging.


Compile your app regularly to ensure there are no errors.


If you experience any exception or error message while using your app, the Helium Logging Service can be used to help with debugging.

Adding a Presenter

Next we will create a presenter to support our view. Presenters contain functions and variables that represent most of the app logic. To create a presenter, create a file named SystemAdminHome.mez under the web-app/presenters folder. Once again, note that there is no restriction to the use of subfolders. A unit can now be declared inside the SystemAdminHome.mez file: 

Unit declaration
unit SystemAdminHome;

Note that even though it is not required for the unit and file to have the same name it is recommended. In addition, Unit names have to be unique.


Use subfolders to logically organise the presenter files in your app.

Unit names have to be unique.

Maintain consistency between your presenter file names and unit names.

Connecting a View and Presenter

In this section we show how to link a view with the presenter created in the previous step. Not all presenters need to be linked to a view though. Even if a presenter is not linked to a view its functions and variables can still be accessed. This is discussed under the Referencing Unit Variables and Functions sections. To link a presenter to a view we will modify the <view/> tag in our  SystemAdminHome.vxml view file as follows:

View unit link
<view label="view_heading.system_admin_home" unit="SystemAdminHome">

In addition we want to have a function that executes each time the view is loaded. To do this we need to add an init function to our presenter/unit and then specify the init function in our view:

Presenter init function
unit SystemAdminHome;
void init() {
	// Placeholder code to be replaced
	int i = 0;
}

Functions in Helium are not allowed to be empty. For that reason we are adding a placeholder statement in our init function for now. This will be replaced shortly.

Specifying view init function
<view label="view_heading.system_admin_home" unit="SystemAdminHome" init="init">

Although it is not necessary to use init in the function name for init functions, it is a useful convention.


Use init in the function name for your init functions to clearly state their purpose and make code easier to understand.

Adding Unit Variables and Modifying Our Info Widget

In this section we want to modify our view info widget to display a more personalised message to the user using their name and surname. To do this we must modify our presenter with unit variables that wil store the values we want to display, we want to populate these values in our init function and we want to modify our properties file to reference these values for the info widget. Firstly we modify our presenter.

Presenter user details
unit SystemAdminHome;

SystemAdmin currentSystemAdminUser;
string firstName;
string lastName;

void init() {
	currentSystemAdminUser = SystemAdmin:user();
	firstName = currentSystemAdminUser.firstName;
	lastName = currentSystemAdminUser.lastName;
}

We also add the currentSystemAdminUser unit variable. This represents the SystemAdmin object instance for the currently logged in "System Admin" user. In addition we also have string unit variables that will represent the name and surname of the currently logged in user:

Unit variables
SystemAdmin currentSystemAdminUser;
string firstName;
string lastName;

To populate the currentSystemAdminUser variable, we need to use a special built-in function to get the object instance for the currently logged in system admin.

User built in function
SystemAdmin:user();

We then need to assign it to our unit variable:

Unit variable assignment
currentSystemAdminUser = SystemAdmin:user();

In this case we know that our logged in user will belong to the "System Admin" role. Helium, however, allows presenters and even views to be shared by different user roles. If for example we invoked  the SystemAdmin:user() built-in function when the currently logged in user was not a system admin, the function would have returned null. To determine the current role for the logged in user one can use the Mez:userRole() built-in function. This function returns a string containing the role name as specified inside the @Role annotation on the model object. See the example below:

Mez:userRole built in function
string currentLoggedInUserType = Mez:userRole();

In addition to the object instance for the currently logged in user, we retrieve the first name and last name value from this object instance by referencing the attributes that we defined as part of the SystemAdmin model object:

Unit variable assignment from object attributes
firstName = currentSystemAdminUser.firstName;
lastName = currentSystemAdminUser.lastName;

Now that we have the necessary unit variables that will be populated in the init function we can reference them in our en.lang properties file by modifying our lang file entry for the info widget:

Before referencing unit variables
info.welcome = Welcome:
info.system_admin_welcome = Welcome System Admin
After referencing unit variables
info.welcome = Welcome:
info.system_admin_welcome = Welcome {SystemAdminHome:firstName} {SystemAdminHome:lastName}

Notice how the curly brackets are used to indicate variable values. Also note the use of both the unit name and the variable name to reference unit variables. At this point it is a good idea to check that the app still compiles by using the build command in the HeliumDev client.


More Complex Info Widget Usage

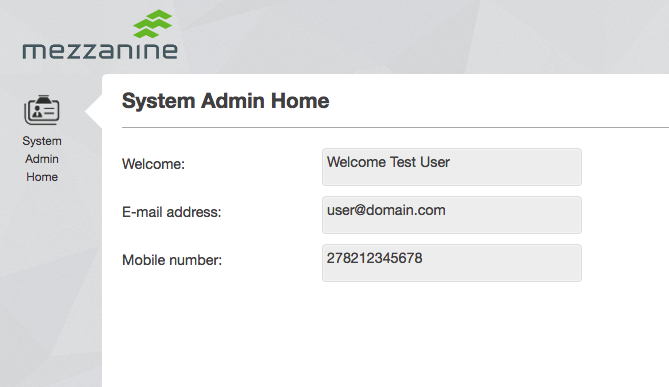
Now that we have explored one way in which to reference unit variables from a info widget, we can explore two different ways. This first way is by displaying an attribute of our complex unit variable directly. To do this we add an info widget beneath our existing info widget that looks as follows:

Info widget referencing unit variable
<!-- Info widget can also be bound to a unit variable -->
<info label="info.mobile_number">
	<binding variable="currentSystemAdminUser">
		<attribute name="mobileNumber"/>
	</binding>
</info>

Note, at this point, that all headings, labels and other static values that need to be displayed on views are retrieved from a properties file. In our case this is the en.lang file. Each entry, that needs to be made to this file, might therefore not be explicitly mentioned in the remainder of this tutorial. If unsure, the source code provided with each lesson can be used as reference.

This info widget is bound to the currentSystemAdminUser variable and references the mobileNumber attribute for that object.

Another option is to use a unit function to return the value that we are interested in. Once again add the following info widget to the SystemAdminHome view:

Info widget referencing unit function
<info label="info.email_address">
	<binding function="getSystemAdminEmailAddress"/>
</info>

The getSystemAdminEmailAddress unit function also needs to be added to the SystemAdminHome presenter:

Unit function
string getSystemAdminEmailAddress() {
	return currentSystemAdminUser.emailAddress;
}

In this case we returned the attribute value directly. We could also have returned the SystemAdmin object and specified the attribute to display as part of the info widget.

At this point, when running the app you should see a view similar to the screenshot below.


Referencing Unit Variables and Functions

The scope of unit functions and variables in Helium is global. When referencing unit functions from a different unit or from a view that is not bound to that unit the function needs to be referenced using both the unit name and function name.

MyUnit:myFunction()

Similarly when referencing a unit variable from a different unit, a view that is not bound to that unit or from a properties file the variable needs to be referenced using both the unit name and the variable name.

MyUnit:myVariable

In any other scenario only the unit name or variable name needs to be used.


Lesson Source Code

Lesson 1.zip